
Professional Landscape Lighting Installation
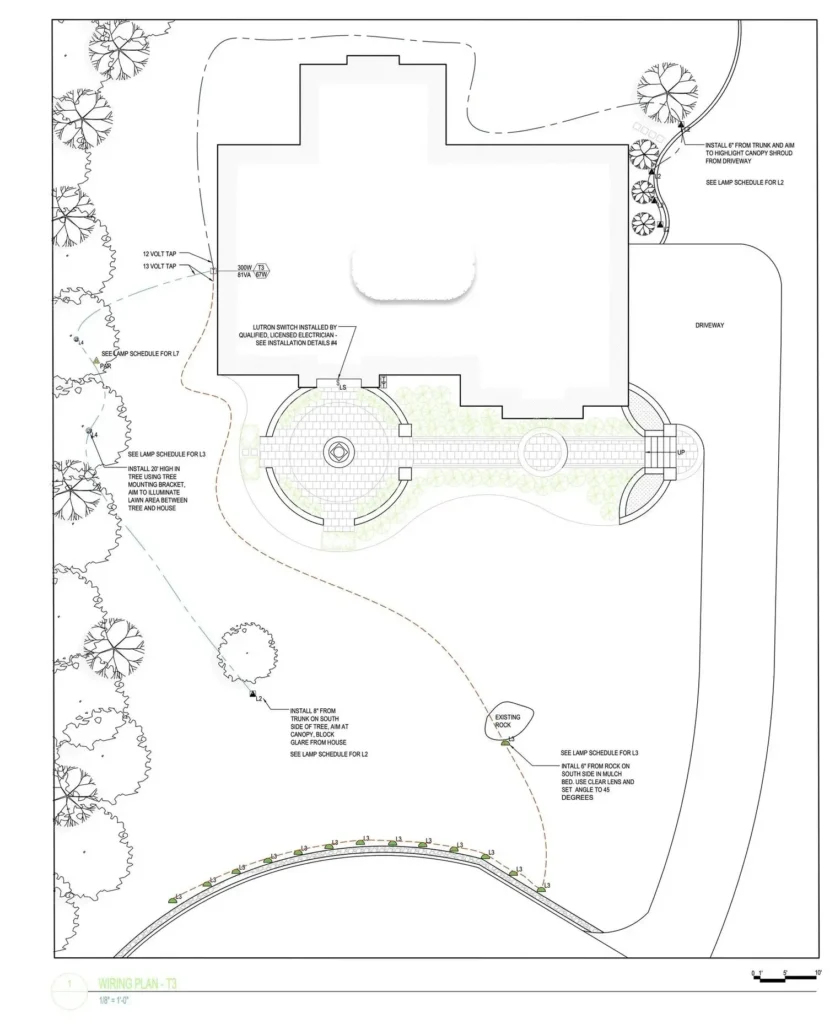
You’ll know exactly what your finished lighting will look like before we ever begin. We create a detailed lighting plan of your property, showing every fixture, which way it aims, what it draws in watts, and how the wire reaches it. We won’t purchase hardware or begin installation until the complete plan has been approved.
Blue Hour Lighting designs and installs low-voltage landscape lighting across Putnam, Westchester, Dutchess, and Rockland counties and Greenwich, Connecticut. Everything below is what happens on a real project, in the order it happens.
What a Landscape Lighting Design Includes
We start by getting to know your space. Jarod walks the property with you, asks how you use the yard, and sees which paths, doors, and outdoor spaces get the most use. That conversation sets the priorities before a single fixture is chosen, and it’s what decides the type of fixtures we will use for your project.
You then get a detailed plan showing:
- Every fixture position and the direction it aims
- Fixture type and wattage for each position
- Transformer locations and the cable paths between them
- How many zones will be required to achieve the goals
You approve the plan before anything gets ordered or installed.
The Installation Process, Step by Step
Layout
Before installation begins, you'll review the plan and approve it, so every fixture purchase and position is confirmed in advance.
Trenching
Wire goes into the ground in shallow trenches, generally around six inches deep, clear of irrigation lines and root zones.
Transformer mounting
The transformer goes on the house or a post near an exterior outlet, high enough to stay out of the snow.
Cable pulls and connections
Cable is drawn out to each zone and joined with waterproof connectors.
Light install
Each landscape light is set, staked or mounted, and leveled.
Night tuning
Every fixture is aimed, tuned, and tested to confirm that each zone is running the way it should.
Keeping Low Voltage Bright
Nearly all residential landscape lighting runs on low voltage, so a nicked wire in a garden bed is a quick, simple fix. It’s also flexible; adding a fixture later is as easy as joining a wire. The trade-off is that 12-volt power fades over distance, so a fixture at the end of a long run can end up dimmer than one closer to the transformer if it’s not set up properly.
Transformers, Wire & Voltage Drop
Voltage drop is where most DIY installs go wrong. We calculate total wattage and cable distance before installation begins. Pushing current down a long, thin cable causes the voltage at the far end to be reduced. LED fixtures tolerate more of this than old halogen lights did, but past a certain point, the far lights dim, shift color, or fail early.
There are four levers, and a good design optimizes all of them:
Transformer Capacity
Transformer capacity isn't something to eyeball. We keep every load under about 80 percent of a transformer's rating. Push past that and a transformer runs hot and wears out sooner than it should. On larger properties, that means multiple transformers, placed near the lights they serve.
Wire Gauge
We use direct-burial cable, starting at 12-gauge and stepping up to heavier cable as the distance and the load grow. Undersizing the cable to save money is the most common mistake we find on systems we're asked to repair.
Circuit Layout
How the lights are grouped matters as much as the wire. A hub layout, a loop, or a T split all balance the load differently, and the right one depends on where the fixtures are located.
Connections Matter
We use waterproof, gel-filled, or heat-shrink connectors, built to last outdoors for years. Twist-on wire nuts wrapped in tape are a shortcut, but they only hold for a season before corrosion sets in. By the time it fails, it's the middle of winter, the worst possible time to lose part of your lighting system.
Your Yard After Landscape Lighting Installation
Where wire needs to cross a driveway or patio, timing matters. If the hardscape is going in as part of the project, we sleeve it during construction. If the hardscape is already completed, we can core drill to recess fixtures or work wiring through masonry joints. Doing so requires a bit more work, but we take the time to do it with precision and correctly every time to preserve the structures that were there first.
Fixture Types and Where We Install Landscape Lighting
Uplighting and Accent Lighting
Fixtures are located at the base of a tree or wall and aimed upward, giving the yard depth. Done well, the fixture disappears completely, and all you notice is the tree or wall it's highlighting.
Path and Walkway Lighting
Low path lights put light on the ground, spaced so the light pools overlap slightly. A classic mistake is lining them all up on one side, creating a runway effect.
Downlighting and Moonlighting
We mount fixtures and aim them through the branches, giving them a natural, moonlit effect.
Grazing
A light set close to a wall throws its beam across the surface and brings out the texture of the stone or brick.
Facade and Front Lawn Lighting
Your home's facade is lit in a balanced manner that makes the front door the focal point, and your lawn's features are lit to bring depth and beauty to the entire property.
Step and Safety Lighting
Every stair gets a step light, and other trouble spots, such as grade breaks where the ground suddenly changes level, pool edges, and dark corners, get the right fixture for the job.
Note: Our security work is lighting-based only. We do not install, supply, or service security cameras or surveillance equipment.
Hardscape Lighting
We build light into each step, wall, and pillar. See hardscape lighting for examples and detailed work that goes into those projects.
Fixture Brands, Materials, and Color Temperature
Blue Hour Lighting installs fixtures from Kichler, CAST Lighting, FX Luminaire, Brilliance LED, Auroralight, Unique Lighting Systems, and Infinity Lighting, brands chosen because they’re built to survive outside year after year. Brass, copper, and stainless steel cost more upfront but outlast cast aluminum by years, and many carry a lifetime factory warranty. A cheap fixture might make it a season or two before it fails, and replacing it usually costs more than the higher-quality fixture would have.
Warmth matters just as much as placement. We stay on the warm end of the spectrum because cooler, bluer light turns plantings gray and makes even a warm-toned house look cold and uninviting.
Do You Need a Licensed Electrician?
For the low-voltage part, no. Everything past the transformer operates at about 12 volts, which is why homeowners can buy kits at a hardware store. The transformer itself is the exception, because it has to plug into a proper exterior GFCI-protected circuit. If your house already has one where the transformer needs to go, we mount and wire the low-voltage side, and you’re done. If it doesn’t, we can provide the proper protected outlet as part of your project.
Low-Voltage Landscape Lighting Maintenance
The outdoor elements can take a toll on landscape lighting. Regular maintenance can keep your system operating and performing as originally intended.
The LED lamps in these fixtures are rated for tens of thousands of hours, so a low-voltage lighting system can go years between lamp changes. Every installation includes a one-year workmanship warranty, and after that most clients move to a maintenance plan: two visits a year, spring and fall, to adjust fixtures, clean lenses, replace failed lamps, repair wiring, and reset timers. We also check transformer load on every visit.
Low-Voltage Landscape Lighting Maintenance
The outdoor elements can take a toll on landscape lighting. Regular maintenance can keep your system operating and performing as originally intended.
The LED lamps in these fixtures are rated for tens of thousands of hours, so a low-voltage lighting system can go years between lamp changes. Every installation includes a one-year workmanship warranty, and after that most clients move to a maintenance plan: two visits a year, spring and fall, to adjust fixtures, clean lenses, replace failed lamps, repair wiring, and reset timers. We also check transformer load on every visit.
The Cost of Outdoor Lighting Installation
Quoting averages can be difficult, as every property requires a different scope of work based on the homeowner’s wants, needs, and the overall layout of the property. Here is what determines the cost:
How much of the yard is being lit
A front facade and walkway project would be much more narrowly scoped than a project for an entire property.
Fixture count and placement
Lights at the base of a tree fifteen feet from the transformer cost less to install than the same lights 200 feet out across a driveway.
Transformer capacity
The distances the cables need to cover determine how many transformers are needed and where they should go.
Wire length
Distance determines both cable gauge and labor involved.
Material grade
Brass, copper, and stainless withstand weather and the elements more than cast aluminum, and are priced accordingly.
Trenching conditions
Trenching and burying lines through a yard is a relatively simple and quick process. Working around established beds, deliberately landscaped plantings, mature root systems, and hardscape crossings takes more time.
Zoning
Each independently controlled area increases both power demand and equipment needed, increasing the cost of the project.
The best way to find the real cost is to schedule a free on-site assessment.
Landscape Lighting Across Westchester and the Hudson Valley
We install landscape lighting throughout Westchester County, Dutchess County, Rockland County, and Greenwich, Connecticut, and we hold the licenses each place requires.
Ready to start? Request a free consultation, and we’ll set up a walkthrough of your yard, or call 845-202-3369.
Landscape Lighting Installation FAQ
Is professional landscape lighting worth it?
It depends on what you want from it. If the goal is simply a light by the front door, there are store-bought kits and DIY options available.
Professional work earns its cost with a design that makes the property look beautiful, components that withstand more than a couple of winters, and an install that doesn’t fail at the connectors. It also adds safety to steps and elevation changes and creates outdoor spaces homeowners want to use at night.
Do you need an electrician to install landscape lighting?
Not for the 12-volt side. The fixtures, the wire, and the connections past the transformer are all low-voltage work.
You need a licensed electrician if a new exterior GFCI circuit has to be added for the transformer. Many houses already have a suitable outlet, and where yours doesn’t, we take care of it.
Is it difficult to install landscape lighting?
Putting a fixture in the ground is easy. Making twenty of them look right together is the hard part.
Sizing transformers, selecting the right wire gauge, managing voltage drop, and properly sealing every splice are all skills that can be learned. The design side, however, takes experience and training. Knowing what to leave in the dark, where to conceal the light source, and how to control glare is what truly makes the difference.